Monday, December 31, 2012

Giving Shoes a Face Lift: Part Two

It's a Brand New Pair of Shoes! Well... sort of :-)

Mod Podge became my new friend this past week. I had another favorite pair of comfy, worn in flats that needed to be dumped in the trash (NOOOOO!) or revamped into some fancy footwear. After Mod Podge-ing fabric onto another pair of shoes, I thought it would be cute to glitter some. I have seen so many fancy glitter flats & heels at the stores, and BINGO! - new craft idea for me. 

Step One: Pick your shoes and favorite glitter! 
 
 Step Two:  Mod Podge the toe of your shoe. Then sprinkle on glitter.  Glue & glitter, part by part.  (Note: after the fact, I decided it would have been better to polish or spray paint the shoe black first)
 
Step Three:  Continue applying Mod Podge and glitter away..  (pardon the blurry pics, my camera was having a hiccup!)
Step Four: Finished applying & glittering.   Then repeat with a 2nd coat of Mod Podge & glitter. Allow to dry for about an hour. 
Step Five: Brush with Satin Varnish or spray with Satin Finish  to seal the glitter.  Nothing worse than sparkles all over! Actually, I can think of many worse things. But it sure creates a mess. Winking smile *update: My shoes began to crackle once the Varnish dried, so I am trying the shoes again with a spray glaze over instead. Mod Podge will work also, but I was worried my matte finish would de-sparkle the glitter
Now I have some twinkle toes of my own!
Perfect for New Year's Eve, whether you are out & about or cozy on your couch.
 
Time to shine on in 2013!

Giving Old Shoes a Face Lift!

      Well, what a whirlwind I've had these past few months. One of my New Year's resolutions is to make sure I am up to date with my posts! Yikes!!   I am on Christmas vacation right now, so I have had some time to finally dig into my craft pile.

     A few months ago, I saw an idea to Mod Podge fabric onto a pair of flats.  I have two pairs that are so comfy, but are looking pretty sad & weathered. This was my chance to revamp them and get a new pair of shoes for free!


I found a tutorial and figured I'd give it a shot. A lazy, rainy day was the perfect time.

Step One: Find a pair of your favorite, but weathered flats and a fabric you love. (Any inexpensive pair of new flats will work too!)

Step Two: Cut out a piece of fabric big enough to cover the shoe. You can be fairly imprecise here; just lay the fabric over the shoe and cut out a general rectangle.

Step Three: Cut a slit in the fabric over the opening of the shoe. You want to leave the fabric whole over the toe, but split it in half to cover the sides. Start at the heel and cut right up the middle until you are half an inch away from the beginning of the toe of the shoe.
Step Four: Cover the toe of the shoe in a thick layer of Mod Podge.
Step Five: Cover the toe of the shoe with your fabric and press it down firmly. You want the fabric to be stretched out and laying flat everywhere so that it doesn’t bunch up and pucker near the sole. Since I was using patterned fabric, I didn't have to worry about keeping lines straight.
Step Six: Cover the sides of the shoe with Mod Podge and press the fabric onto the shoe. Keep making sure the fabric lays flat. Leave about 2 inches uncovered near the heel so you can make a nice seam.
Step Seven: Cut one side of the fabric so it covers the heel and goes about half an inch past the heel seam. Apply Mod Podge and press the fabric down.

Step Eight: Cut the other side of the fabric one inch past the middle heel seam of the shoe. Fold half an inch of fabric under at the edge to hide the raw edge, then apply Mod Podge and smooth the fabric down onto the shoe. Make sure to keep the raw edge folded under to make a nice seam at the back.     (I forgot to take a picture of this part..see here and here ).


Step Nine: Trim away the excess fabric using your scissors. You don’t need to be extremely precise here either. For the bottom of the fabric just run the scissors along the sole of your shoe as a guide (you will cut this fabric more exactly later on). For the top of the fabric just follow the curve of the opening of the shoe, leaving about half an inch. Then cut slits in the fabric in the curve of the toe so that you can fold the fabric over without stretching it.
Step Ten: Apply Mod Podge to the under side of the toe of the shoe; fold the fabric over and press firmly.
Step Eleven: Continue applying Mod Podge and folding the fabric over around the opening of the shoe. Since it's the inside of the shoe, you can cut imperfectly if you want. :-) I also didn't worry about the weathered insole of the shoe since no one will see it when I am wearing them, but I may go buy some new inserts for new support. 

Step Twelve: Using your exacto knife, trim off the excess fabric at the sole of the shoe. Make sure your knife is SHARP for this part! Don’t worry if there is a little bit of fraying at the edge; that will get fixed when you Mod Podge it down. Once your fabric is trimmed down, apply Mod Podge and press the edges down. Smooth it out to keep it from bunching up and tuck any frayed edges in.

Step Thirteen: Cover the entire shoe in a thick layer of Mod Podge. Allow it to dry overnight (I let it go about 12 hours) and you’re done!
Voila! New shoes! 

Directions from Jessi at Practically Functional.

Thursday, November 22, 2012

Grateful

Today on this Thanksgiving, I am filled with gratefulness...


I am thankful my dad still calls me to tell me when Charlie Brown holiday specials are on TV.

I am thankful for my amazing parents and the endless love they give me.

I am thankful for the happiness around us.

I am thankful for my best friends and their open hearts.

I am thankful for curiosity and adventure. 

I am thankful for my huge family.

I am thankful for my sweet goddaughters, they bring me so much joy.

I am thankful for life. It is so precious and moving forward, we must treat life with care.


Be grateful for everything you are blessed with!! 


Sunday, October 21, 2012

My First Triathlon!

      September 8, 2012 I became a triathlete!!!  The weeks leading up to the race I was feeling nervous, excited, prepared, unprepared. I guess it was all part of the anxiety of the unknown.  I had a lot of hiccups along the way: a week long illness & fever, leg cramps, figuring out how to change my bike gears and then my bike brakes literally cracking in half a week before the race. ugh!   But.... I still did it and the triathlon was one of the most thrilling things I have ever done in my life! 

     
    Race morning I headed down to Liberty Station in Point Loma at 5:30am & began to set up everything I needed for the day.  I had no idea what I was doing, but thankfully I watched a few youtube videos about how to set up transition.  My mom came down to the start and watched me get ready to embark on this little adventure. 


     Soon enough, they were announcing for everyone to get out of transition area & get to the start line! We headed over to the water, it was a really beautiful day but with no clouds in the sky - people were nervous about the heat. The last thing you want on race day is full sun exposure!

     
The race started at 6:15am and I was in the 5th wave, set to start at 6:22am. 

     As the waves in front of me started in the water, the feeling of excitement grew more & more.  I couldn't believe I was about to do this!  So I gave my mom a big hug and jumped in the water... The sun was barely coming up (even though it was warm already), so I was nervous about how murky or cold the water would be. It was perfect conditions, or much better than murky Mission Bay!  They called "wave 1.... wave 2..." and so on until "wave 5, please swim to the start line!" Eeek, I looked around at everyone else and just took deep breaths as I prepared myself. And then we were off!


     The first 100 m or so were a disaster, I was so excited and swam off in a hurry, was trying to catch my breath and  occasionally sidestroking. I came up after the first buoy and pulled myself together mentally and just started a methodical routine of stroke, stroke, stroke, breath... I watched as people passed me but I found my groove and just went for it. The swim was freeing and calming. I was one of the slower swimmers in my group but I kept checking to make sure I wasn't last! hehee... As I came out of the water, I found my mom relieved I hadn't drown. 


Now it was time for the bike transition, I think it was about 6 minutes (hey, I am still new to this) and I was off on the bike! My mom was able to see me take off & come in for the end of my ride.

       
     The bike portion of the race was great. I was reeeeeeally nervous about this one hill that we had to ride twice, and since this part of the course was on the Naval Base, there was no way to see the hill pre-race.  My goal was "don't fall on the hill!" Well, I didn't fall, I passed people who were walking their bikes and overcame my fear of hill climbing (at least for the time being). It was hot out there, but not too bad.  My seat definitely needs to be raised again because I felt like I wasn't moving much for the amount of energy I was exerting.  As I was finishing up loop 1 of the bike portion, I was flying down a hill to see my friends, Todd & Tammy, standing on the corner cheering me on!  What a boost!   I completed the next loop with confidence going up the hill again and just finished up the best I could. 

     
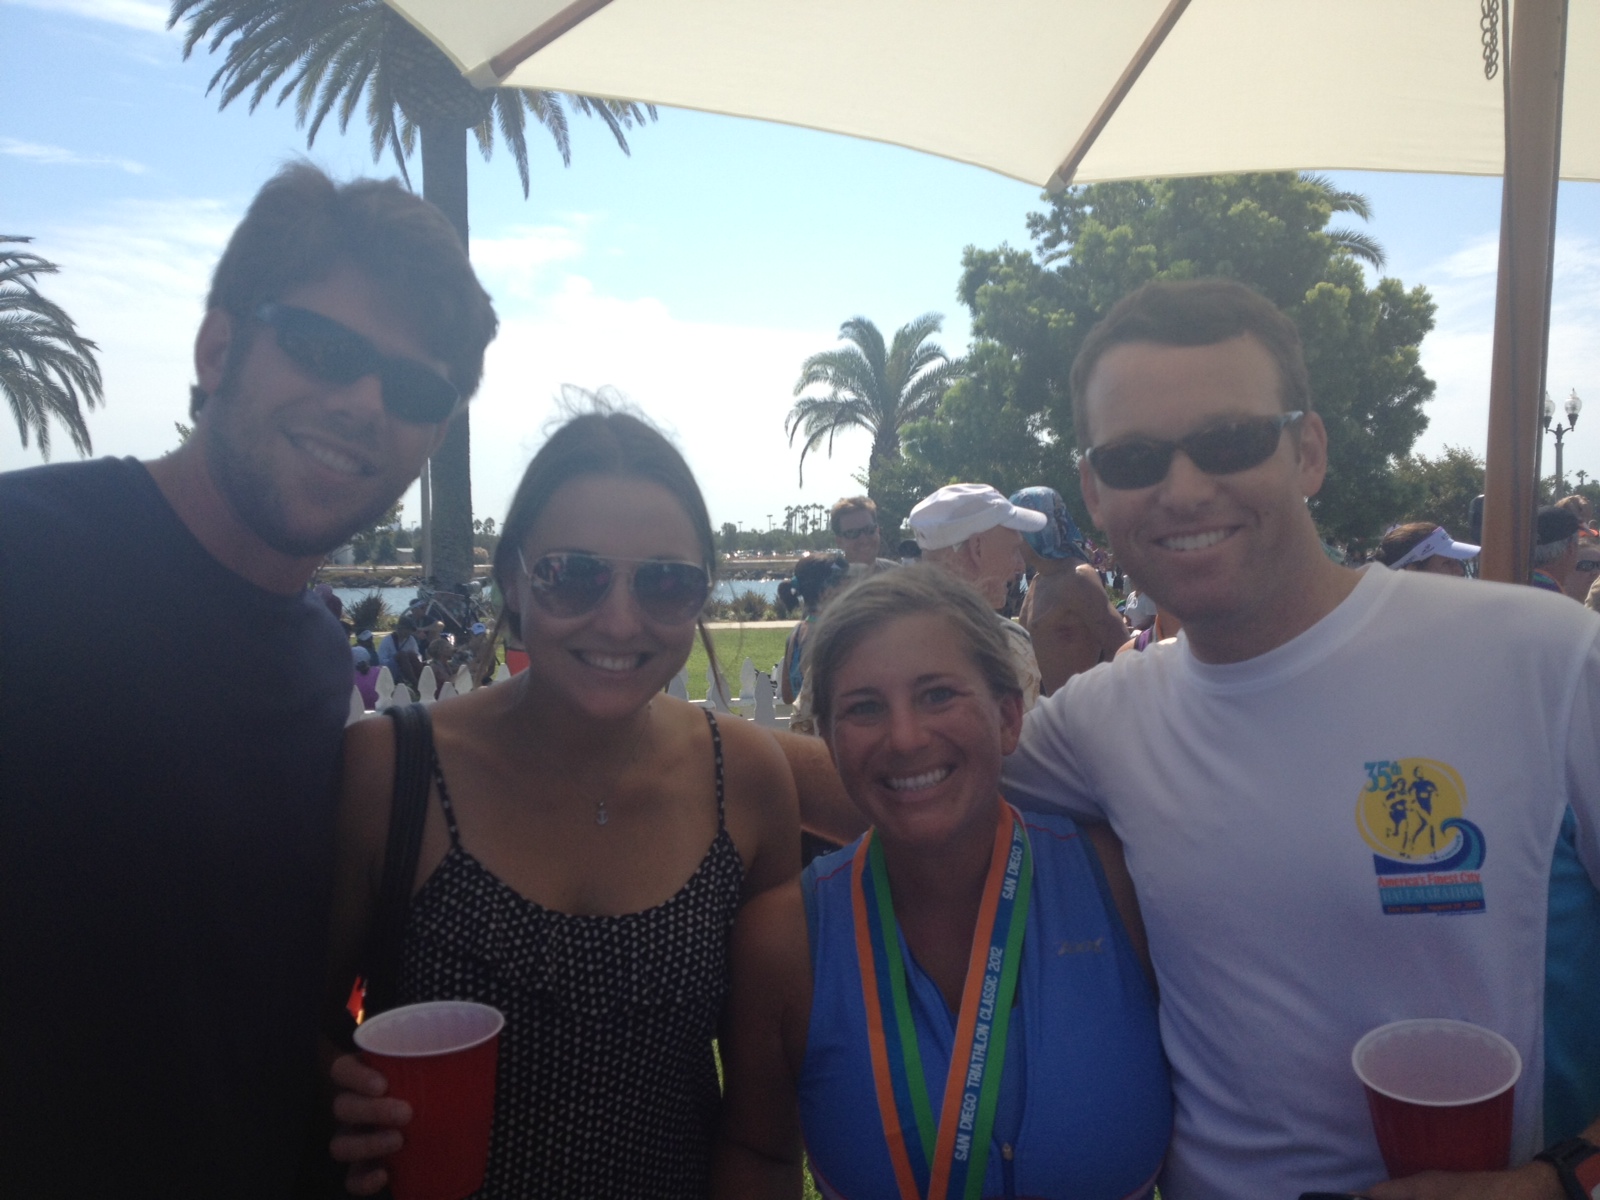
     As I came in to Transition 2, my friend Ashley was cheering my into the bike finish. Another boost! I ran my bike in, ripped off my gloves and helmet. I took off for the run and I felt like I was sprinting.. then I looked down at my watch and apparently my legs were lead. I was hardly moving!  Running after a bike ride is the weirdest sensation on your legs. I was thirsty, thirsty, thirsty and stopped for every tiny bit of water I could get on this 6 mile run.  Tammy, Todd, Ashley and another surprise guest, Jeff, arrived on the run course and pushed me with positive thoughts. I love that my friends are active and we support each other in our little endeavors!  So as I finished up my run I hauled my little buns to the finish line and collected my sweeeet medal!

     
  Yipeeeeeeeee! I think I really was saying that as I crossed the finish line.


    Free beer garden celebrations for participants and spectators. 
Todd, Tammy and Jeff were definitely not passing up the free Stone Brewing Co. beer.


Thanks to my mom, Ashley, Todd, Tammy & Jeff for coming out and supporting me!

So... When is the next one?

Wednesday, October 10, 2012

Paleo Carrot-Cake Muffins

      I got a bag of fresh carrots last week from our school's Farm 2 Kids program and yes, the produce is for the kids buuuuut they always give the teachers a bag too. So... I don't turn down fresh produce when it's offered!  My students were asking me for ideas for their carrots and after suggestion muffins or bread,  I wanted to do a little baking over the weekend.   I also recently threw out all my wheat flour, so I looked for a gluten-free carrot cake muffin recipe.  Thanks to Paleo being all the rage these days, it was easy to find a pretty yummy looking recipe.

     I found this one on MomGonePaleo... The result was nutty, tasty and a little salty!


 Paleo Carrot Cake Muffins:

2 1/4 cups almond flour (I used almond meal, so the texture was a little nuttier)
1/2 tsp baking soda
1/2 tsp salt
2 tsp ground cinnamon
1 tsp nutmeg
1/2 tsp each of allspice, clove and ginger
3 tbs melted coconut oil or butter
3 eggs beaten
2-3 tbsp honey (start with 2 then add the 3rd if you want it sweeter)
1 tbsp vanilla extract
3/4 cup shredded carrot (I did a little extra!)
1/2 cup raisins (optional)
1/2 cup chopped walnuts (optional)
1/4 cup shredded coconut (optional)

 Used my food processor to shred up fresh carrots - still had leftovers for salads this week!
 Mix 'er up!
 This recipe made about 16 delightfully, surprising muffins! 
I brought them to work on Monday... mixed reviews because they are different. The muffins turned out extremely moist and fluffy but they are saltier & less sweet than what most would expect of a muffin. I love the way almond meal bakes, but some people aren't used to gluten & (processed) sugar free foods.  BUT I was very happy with a new breakfast treat and I've had one every day this week ;)
If you don't mind venturing away from regular flour and trying more natural ingredients, I highly suggest these little guys. Carrots, almonds, walnuts -- I've convinced myself that I am eating lots of goodness in these muffins!  Now you should to! 

Cheers,
Belle 

Sunday, October 7, 2012

Power Smoothie!

I have to eat breakfast. It is a meal I can't skip, or else I am sluggish and my appetite is off all day. Unfortunately I don't have time to make scrambled eggs or a fritatta, so I usually go for a protein smoothie. This one is full of fiber, protein & good fats.

 
Power Smoothie: 
3/4 cup unsweetened almond milk
1/2 banana (about 6 frozen slices)
1 scoop protein powder
1/2 Tbsp flax seeds
1 Tbsp nut butter (almond, sunflower or peanut
Ice cubes, if you like more of a milkshake consistency 


Tips for the day: 

1) Blend all ingredients first except the nut butter, then add nut butter in once smooth - It blends in better without sticking to all the sides of the blender!

2) Slice and flash freeze bananas when you buy them. Then stick in a freezer bag for later use. It makes the smoothie creamier!

Speaking of breakfast, I am hungry and going to make one of these right now!

Monday, October 1, 2012

Monthy Update

Well, it's been over a month since I have updated. Here is what's been going on....

School started again. 

Went sailing for the first time. 

A family member passed away = a lot of family time together and celebrating life. 

My tomato & pepper plants are still growing.

I completed my first triathlon. 
      The triathlon was amazing.... look for a full post soon!

       I can't believe it is already October!!!   Although September had some nice & memorable moments, it was an extremely hard month. A lot of sadness & loss, school work piled up over & over, and a mental breakdown with running. I am so so happy for a new month to be here, and hopefully more happiness and less stress in store for me & others around me.

       Things I am looking forward to in October:
    • a trapeze lesson this weekend
    • a possible Disneyland trip
    • Japanese themed dinner club
    • Halloween!
Cheers & wishes for cooler San Diego weather,
Belle